
Gtalk အသံုးျပဳသူတိုင္းမွာ အေကာင့္တစ္ခုထက္ ပိုျပီးရွိၾကပါတယ္. တစ္ခ်ိဳ ့ဆို
၄-၅-၆ ခုထိရွိတာေတြ ့ဖူးပါတယ္.ဒီလို အေကာင့္ေတြမ်ားေတာ့ အေကာင့္သစ္
ဖြင့္တဲ့ေနရာမွာ Ph number ေတြေတာင္းလာတယ္... အခုဆို Gmail အသစ္
ဖြင့္ဖို ့ေတာ္ေတာ္ကို ခက္ခဲသြားပါျပီ..... .အခုတင္ျပခ်င္တာက အေကာင့္အ
Thursday, December 27, 2012

Gmail အေကာင့္ဖြင့္မရလွ်င္ဒီလိုလုပ္(ျမန္မာျပည္မွသူမ်ားထံမွ်ေ၀ေပးပါ)
Gmail အေကာင့္ဖြင့္မရလွ်င္ဒီလိုလုပ္(ျမန္မာျပည္မွသူမ်ားထံမွ်ေ၀ေပးပါ)

ကြန္ပ်ဴတာတစ္လံုးထဲမွာပဲGtalk အေကာင့္20ေလာက္ဖြင့္ဖို ့လုပ္ရေအာင္
ကြန္ပ်ဴတာတစ္လံုးထဲမွာပဲGtalk အေကာင့္20ေလာက္ဖြင့္ဖို ့လုပ္ရေအာင္
ဘာပညာၾကီးေတာ့မဟုတ္ဘူးလူအေတာ္မ်ားမ်ားလုပ္ဖူးေနၾကတာပဲေလက်ေနာ့ေဘာ္ ဒါေတြအတြက္ပညာစုစည္းမႈျဖစ္ေအာင္တင္ေပးထားလိုက္တာေမးတဲ့သူကေမးေနေနၾကတယ္ေနာ္..အဲတာေၾကာင့္ပါ

(၁)Desktop(ကြန္ပ်ဴတာမ်က္ႏွာျပင္)မွာရွိေနတဲ့GtalkကိုR-Ckickႏွိပ္Propertiesႏွိပ္ပါ
Gtalk တြင္ မိမိ ဓာတ္ပံုမ်ားကို Auto ေၿပာင္းေနခ်င္ရင္ ..
အခု က်ေနာ္ ... Gtalk နဲ့ ဆိုင္ တဲ့ ေဆာ့၀ဲ ေလးတစ္ခုကိုေၿပာ ၿပ ပမယ္ .
အဲ့ဒီ ေဆာ့၀ဲ ဟာ ... Gtalk လိုမ်ိဳးပဲအသံုးၿပဳရတာပါ.
ဒါေပမဲ့ ထူးၿခားခ်က္ေတြကေတာ့ .... မိမိGTalk မွဓာတ္ပံုမ်ားကို ... ... ...ကိုယ္ၾကိဳက္ရာ ဓာတ္ပံုေရြးၿပီးAuto ေၿပာင္းေနပါပဲ။
ဘာမွ လဲ မခက္ပါဘူး ... ေအာက္မွာရွိတဲ့ Download Link ေလးကို ေဒါင္းၿပီး
Run လိုက္ရင္ ရပါၿပီ၊
Run ၿပီးရင္ေတာ့ Gtalk Shell Icon ေလးကိုဖြင့္ၿပီး.... ေအာက္က ပံုေလးေတြအတိုင္း
အဲ့ဒီ ေဆာ့၀ဲ ဟာ ... Gtalk လိုမ်ိဳးပဲအသံုးၿပဳရတာပါ.
ဒါေပမဲ့ ထူးၿခားခ်က္ေတြကေတာ့ .... မိမိGTalk မွဓာတ္ပံုမ်ားကို ... ... ...ကိုယ္ၾကိဳက္ရာ ဓာတ္ပံုေရြးၿပီးAuto ေၿပာင္းေနပါပဲ။
ဘာမွ လဲ မခက္ပါဘူး ... ေအာက္မွာရွိတဲ့ Download Link ေလးကို ေဒါင္းၿပီး
Run လိုက္ရင္ ရပါၿပီ၊
Run ၿပီးရင္ေတာ့ Gtalk Shell Icon ေလးကိုဖြင့္ၿပီး.... ေအာက္က ပံုေလးေတြအတိုင္း
မိမိကြန္ပ်ဴတာထဲမွာေဇာ္ဂ်ီရွိျပီးစာမေပၚရင္
ေဇာ္ဂ်ီေဖာင့္ရွိရဲ့သားနဲ ့တစ္ခ်ိဳ ့ဆိုဒ္ေတြမွာစာမေပၚဘဲပဲပင္ေပါက္ ေတြျဖစ္ေနပါတယ္အဲ့လိုမ်ိဳးျဖစ္ခဲ့ရင္ေတာ့
mozilla firefox ကိုဖြင့္ Tools ထဲက Option ကိုဖြင့္ပါ။
mozilla firefox ကိုဖြင့္ Tools ထဲက Option ကိုဖြင့္ပါ။

Content ဆိုတဲ့ Tab ထဲမွာ Defaunt Font ထဲမွာ Zawgyi-one ကိုေရြးေပးပါ။

Advanced ဆိုတာကို ထပ္ႏွိပ္ပါ။ serif: ဆိုတဲ့ေနရာမွာ Zawgyi-One ကိုေရြးေပးပါ။

ျပီးသြားပါကသင့္စက္မွာေဇာ္ဂ်ီအဆင္ေျပစြာကပါလိမ့္မယ္။ အဆင္ေျပႀကပါေစ။
Facebook မွာ ကိုယ္နဲ ့ သေဘာထားမတိုက္ဆိုင္သူမ်ားကို block လုပ္နည္း

ဟိုးတေလာက အိုမား ကေမးတယ္ ။အေမာင္ေရ ေဖ့ဘြတ္မွာ Block လုပ္ခ်င္လို ့တဲ့
Facebook မသံုးခ်င္ေတာ့၍ အေကာင့္ကို အျပီးအပိုင္ ဖ်က္ခ်င္ရင္
ဒီနည္းေလးကေတာ့ အေကာင့္ကို မသံုးခ်င္ေတာ့၍ ဖ်က္ခ်င္တယ္ဆိုရင္ ဒီနည္းေလး
ကိုလုပ္ၾကည့္ပါ အခုတေလာ အေၾကာင္းအမ်ိဳးမ်ိဳးေၾကာင့္ ဖြဘုတ္ေခၚFacebook ကို
မသံုးခ်င္ေတာ့ဘူးဆိုရင္ အျပီးဖ်က္တဲ့နည္းရွိသလို ခဏအေနနဲ ့ပိတ္ထားခ်င္လည္း
ရပါတယ္ ။လုပ္တဲ့နည္းက Facebook helpထဲမွာ ေရးထားျပီးသားပါ ။ဒီနည္းေလးကို ေရးဖို ့အစျပဳ အေကာင္ထည္ေဖာ္ေပးသူက ငပိုင္(UAE) ပါ သူက ဖ်က္ခ်င္ေနတာနဲ ့
Wednesday, December 26, 2012
ကိုယ့္ဆိုဒ္ရဲ႔ စာမ်က္ႏွာမွာႏွင္းေလးေတြ တဖြဲဖြဲက်ေနေစခ်င္ရင္
ကိုယ့္ဆိုဒ္စာမ်က္ႏွာေပၚမွာ
ႏွင္းေလးေတြတဖြဲဖြဲက်ေနတဲ့ Effect ေလးထည့္ခ်င္တယ္ဆိုရင္ေတာ့
ေအာက္ကကုဒ္ေလးကို စာမ်က္ႏွာရဲ႔တစ္ေနရာမွာ HTMl Mode
နဲ႔ရိုက္ထည့္ေပးလိုက္ပါ။
ဒါဆိုရင္ေတာ့ သင့္ဆိုဒ္ရဲ႔စာမ်က္ႏွာမွာ ႏွင္းစက္ေလးေတြတဖြဲဖြဲက်ေနမွာပဲျဖစ္ပါတယ္ . .။
ထည့္ရမယ့္ HTML ေလးကေတာ့ ေအာက္ပါအတိုင္းျဖစ္ပါတယ္ဗ်ာ . . .။
<!--
This Script is from www.htmlfreecodes.com, Coded by: Krishna Eydat-->
<body>
<LAYER NAME="a0" LEFT=10 TOP=10 VISIBILITY=SHOW BGCOLOR="#FFFF00"
CLIP="0,0,3,3"></LAYER>
<LAYER NAME="a1" LEFT=10 TOP=10 VISIBILITY=SHOW BGCOLOR="#FFFF00"
CLIP="0,0,3,3"></LAYER>
<LAYER NAME="a2" LEFT=10 TOP=10 VISIBILITY=SHOW BGCOLOR="#FFFF00"
CLIP="0,0,3,3"></LAYER>
<LAYER NAME="a3" LEFT=10 TOP=10 VISIBILITY=SHOW BGCOLOR="#FFFF00"
CLIP="0,0,3,3"></LAYER>
<LAYER NAME="a4" LEFT=10 TOP=10 VISIBILITY=SHOW BGCOLOR="#FFFF00"
CLIP="0,0,3,3"></LAYER>
<LAYER NAME="a5" LEFT=10 TOP=10 VISIBILITY=SHOW BGCOLOR="#FFFF00"
CLIP="0,0,3,3"></LAYER>
<LAYER NAME="a6" LEFT=10 TOP=10 VISIBILITY=SHOW BGCOLOR="#FFFF00"
CLIP="0,0,3,3"></LAYER>
<script language="JavaScript">
<!--
if (document.all){
document.write('<div id="starsDiv"
style="xg-p:absolute;top:0px;left:0px">')
for (xy=0;xy<7;xy++)
document.write('<div
style="xg-p:relative;width:3px;height:3px;background:#FFFF00;font-size:2px;visibility:visible"></div>')
document.write('</div>')
}
if
(document.layers)
{window.captureEvents(Event.MOUSEMOVE);}
var yBase = 200;
var xBase = 200;
var yAmpl = 10;
var yMax = 40;
var step = .2;
var ystep = .5;
var currStep = 0;
var tAmpl=1;
var Xbpos = 1;
var Ybpos = 1;
var i = 0;
var j = 0;
if (document.all)
{
function MoveHandler(){
Xbpos = document.body.scrollLeft+event.x;
Ybpos = document.body.scrollTop+event.y;
}
document.onmousemove = MoveHandler;
}
else if (document.layers)
{
function xMoveHandler(evnt){
Xbpos = evnt.pageX;
Ybpos = evnt.pageY;
}
window.onMouseMove = xMoveHandler;
}
function animateLogo() {
if (document.all)
{
yBase = window.document.body.offsetHeight/4;
xBase = window.document.body.offsetWidth/4;
}
else if (document.layers)
{
yBase = window.innerHeight/4 ;
xBase = window.innerWidth/4;
}
if (document.all)
{
var totaldivs=document.all.starsDiv.all.length
for ( i = 0 ; i < totaldivs ; i++ )
{
var tempdiv=document.all.starsDiv.all[i].style
tempdiv.top = Ybpos +
Math.cos((20*Math.sin(currStep/20))+i*70)*yBase*(Math.sin(10+currStep/10)+0.2)*Math.cos((currStep
+ i*25)/10);
tempdiv.left = Xbpos +
Math.sin((20*Math.sin(currStep/20))+i*70)*xBase*(Math.sin(10+currStep/10)+0.2)*Math.cos((currStep
+ i*25)/10);
}
}
else if (document.layers)
{
for ( j = 0 ; j < 7 ; j++ )
{
var templayer="a"+j
document.layers[templayer].top = Ybpos +
Math.cos((20*Math.sin(currStep/20))+j*70)*yBase*(Math.sin(10+currStep/10)+0.2)*Math.cos((currStep
+ j*25)/10);
document.layers[templayer].left =Xbpos +
Math.sin((20*Math.sin(currStep/20))+j*70)*xBase*(Math.sin(10+currStep/10)+0.2)*Math.cos((currStep
+ j*25)/10);
}
}
currStep += step;
setTimeout("animateLogo()", 15);
}
animateLogo();
// -->
</script>
</body>
<font face="Tahoma"><a target="_blank"
href="http://www.htmlfreecodes.com/"><span style="font-size: 8pt;
text-decoration: none">HTML Free
Code</span></a></font>
ဒီကုဒ္ေလးကိုထည့္ၿပီးရင္ေတာ့ ႏွင္းေတြတဖြဲဖြဲက်ေနတဲ့ စာမ်က္ႏွာေလးတစ္ခုဖန္တီးႏိုင္ၿပီပဲျဖစ္ပါတယ္။
အားလံုးစာမ်က္ႏွာအလန္းေလးေတြဖန္တီးႏိုင္ၾကပါေစဗ်ာ . . ။
ဒါဆိုရင္ေတာ့ သင့္ဆိုဒ္ရဲ႔စာမ်က္ႏွာမွာ ႏွင္းစက္ေလးေတြတဖြဲဖြဲက်ေနမွာပဲျဖစ္ပါတယ္ . .။
ထည့္ရမယ့္ HTML ေလးကေတာ့ ေအာက္ပါအတိုင္းျဖစ္ပါတယ္ဗ်ာ . . .။
<!--
This Script is from www.htmlfreecodes.com, Coded by: Krishna Eydat-->
<body>
<LAYER NAME="a0" LEFT=10 TOP=10 VISIBILITY=SHOW BGCOLOR="#FFFF00"
CLIP="0,0,3,3"></LAYER>
<LAYER NAME="a1" LEFT=10 TOP=10 VISIBILITY=SHOW BGCOLOR="#FFFF00"
CLIP="0,0,3,3"></LAYER>
<LAYER NAME="a2" LEFT=10 TOP=10 VISIBILITY=SHOW BGCOLOR="#FFFF00"
CLIP="0,0,3,3"></LAYER>
<LAYER NAME="a3" LEFT=10 TOP=10 VISIBILITY=SHOW BGCOLOR="#FFFF00"
CLIP="0,0,3,3"></LAYER>
<LAYER NAME="a4" LEFT=10 TOP=10 VISIBILITY=SHOW BGCOLOR="#FFFF00"
CLIP="0,0,3,3"></LAYER>
<LAYER NAME="a5" LEFT=10 TOP=10 VISIBILITY=SHOW BGCOLOR="#FFFF00"
CLIP="0,0,3,3"></LAYER>
<LAYER NAME="a6" LEFT=10 TOP=10 VISIBILITY=SHOW BGCOLOR="#FFFF00"
CLIP="0,0,3,3"></LAYER>
<script language="JavaScript">
<!--
if (document.all){
document.write('<div id="starsDiv"
style="xg-p:absolute;top:0px;left:0px">')
for (xy=0;xy<7;xy++)
document.write('<div
style="xg-p:relative;width:3px;height:3px;background:#FFFF00;font-size:2px;visibility:visible"></div>')
document.write('</div>')
}
if
(document.layers)
{window.captureEvents(Event.MOUSEMOVE);}
var yBase = 200;
var xBase = 200;
var yAmpl = 10;
var yMax = 40;
var step = .2;
var ystep = .5;
var currStep = 0;
var tAmpl=1;
var Xbpos = 1;
var Ybpos = 1;
var i = 0;
var j = 0;
if (document.all)
{
function MoveHandler(){
Xbpos = document.body.scrollLeft+event.x;
Ybpos = document.body.scrollTop+event.y;
}
document.onmousemove = MoveHandler;
}
else if (document.layers)
{
function xMoveHandler(evnt){
Xbpos = evnt.pageX;
Ybpos = evnt.pageY;
}
window.onMouseMove = xMoveHandler;
}
function animateLogo() {
if (document.all)
{
yBase = window.document.body.offsetHeight/4;
xBase = window.document.body.offsetWidth/4;
}
else if (document.layers)
{
yBase = window.innerHeight/4 ;
xBase = window.innerWidth/4;
}
if (document.all)
{
var totaldivs=document.all.starsDiv.all.length
for ( i = 0 ; i < totaldivs ; i++ )
{
var tempdiv=document.all.starsDiv.all[i].style
tempdiv.top = Ybpos +
Math.cos((20*Math.sin(currStep/20))+i*70)*yBase*(Math.sin(10+currStep/10)+0.2)*Math.cos((currStep
+ i*25)/10);
tempdiv.left = Xbpos +
Math.sin((20*Math.sin(currStep/20))+i*70)*xBase*(Math.sin(10+currStep/10)+0.2)*Math.cos((currStep
+ i*25)/10);
}
}
else if (document.layers)
{
for ( j = 0 ; j < 7 ; j++ )
{
var templayer="a"+j
document.layers[templayer].top = Ybpos +
Math.cos((20*Math.sin(currStep/20))+j*70)*yBase*(Math.sin(10+currStep/10)+0.2)*Math.cos((currStep
+ j*25)/10);
document.layers[templayer].left =Xbpos +
Math.sin((20*Math.sin(currStep/20))+j*70)*xBase*(Math.sin(10+currStep/10)+0.2)*Math.cos((currStep
+ j*25)/10);
}
}
currStep += step;
setTimeout("animateLogo()", 15);
}
animateLogo();
// -->
</script>
</body>
<font face="Tahoma"><a target="_blank"
href="http://www.htmlfreecodes.com/"><span style="font-size: 8pt;
text-decoration: none">HTML Free
Code</span></a></font>
ဒီကုဒ္ေလးကိုထည့္ၿပီးရင္ေတာ့ ႏွင္းေတြတဖြဲဖြဲက်ေနတဲ့ စာမ်က္ႏွာေလးတစ္ခုဖန္တီးႏိုင္ၿပီပဲျဖစ္ပါတယ္။
အားလံုးစာမ်က္ႏွာအလန္းေလးေတြဖန္တီးႏိုင္ၾကပါေစဗ်ာ . . ။
G talk ကို Online friend alarm ေပးထားမယ္.
gtalk ကိုအသံုးျပဳ႕သူတုိင္း... သိထားသင့္တယ္ထင္လို႕ပါ...အခ်ုိဳ႕ကေတာ့သိၿပီးပါၿပီ....မသိတဲ႕သူမ်ားအ အတြက္ရည္ရြယ္ပါတယ္....သိ
တဲ႕သူေတြကေတာ့မရီနဲ႕ဗ်ာ......
G talk မွာအြန္လိုင္းတက္လာသူေတြကို g talk box ကိုဖြင့္မၾကည္႕ပဲ သိေအာင္လုပ္လို႕ရပါတယ္...
ဘယ္ software ကိုထပ္ျဖည္႕စရာမလိုပါဘူး....
အရင္ဆံုး g talk ကို sing in ဝင္လိုက္ပါ...
ၿပီးရင္ setting ကိုသြားပါ....
တဲ႕သူေတြကေတာ့မရီနဲ႕ဗ်ာ......
G talk မွာအြန္လိုင္းတက္လာသူေတြကို g talk box ကိုဖြင့္မၾကည္႕ပဲ သိေအာင္လုပ္လို႕ရပါတယ္...
ဘယ္ software ကိုထပ္ျဖည္႕စရာမလိုပါဘူး....
အရင္ဆံုး g talk ကို sing in ဝင္လိုက္ပါ...
ၿပီးရင္ setting ကိုသြားပါ....
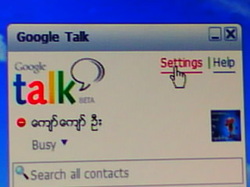
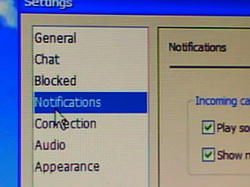
setting ကိုဝင္ၿပီးတာနဲ႕ Notification ဆိုတဲ႕tab ကေလးတစ္ခုရွိပါတယ္...
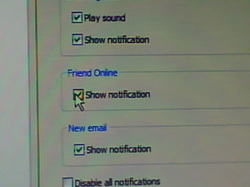
အဲဒီ tab ကိုဖြင့္လို္က္ပါ... Notification ဆိုတဲ႕ tab ထဲမွာ Friend Online ဆိုတဲ႕ box ကေလးတစ္ခုရွိပါတယ္.
အဲဒီ box ထဲက show notification ဆိုတဲ႕ စာသားရဲ႕ေရွ႕က ေလးေထာင့္တံုးေလးကို အမွန္ခ်စ္ေပၚေအာင္ click နွိပ္လို္က္ပါ... ၿပီးရင္ Ok နဲ႕ ထြက္လုိက္ပါ...
သင့္ရဲ႕သူငယ္ခ်င္းေတြအြန္လို္င္းေပၚတက္လာတာနဲ႕... destop screen ရဲ႕ညာဘက္ေထာင့္မွာ တက္လာသူရဲ႕အမည္ကို ျပပါလိမ္႕မယ္....
အဲဒီအခါက်ရင္ ဦးဦးဖ်ားဖ်ားေလး လွမ္းေခၽြလိုက္ေပါ့...
ခၽြင္းခ်က္ ... busy အေနနဲ႕..(အနီေရာင္အတုန္းေလးနဲ႕) အြန္လိုင္းေပၚကိုသင့္ရဲ႕သူငယ္ခ်င္းေတြတက္လာ ရင္ေတာ့ alarm အေနနဲ႕လာျပမွာမဟုတ္ပါဘူး....
အားလုံးကုိေက်းဇူးပါ..
Subscribe to:
Posts (Atom)
LinkWithin

